Adding
a New Reporting Tree
Before
you build any Reporting Trees, you will first need to determine the various
reporting structures your company will require. The best approach
is to draw an organizational chart of your company. Refer to the topic,
Reporting Unit Structures.
Use your current general ledger departments as the lowest detail level.
Add to these as many boxes as you need to show higher-level divisions
or regions. Remember that each box represents a potential reporting unit
in any of your Reporting Trees.
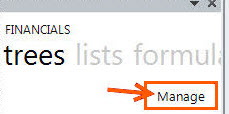
- To manage reporting units, in the trees tab, click Manage.
From the Manage Reporting Trees window,
you can now Add a new or
Edit, Delete,
Rename or Duplicate
your existing Reporting Trees.

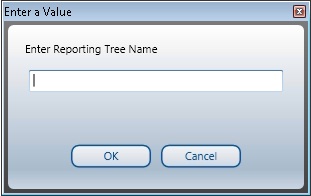
- We're going to add a reporting tree. Select
Add.
- Enter a name for your Reporting Tree.
- In the right pane each reporting unit
will need to be added in a separate row with its relevant account
filter rule.

- The graphical tree on the left side of
the Reporting Tree Manager allows you to visualize the relationship
of parent/child unit hierarchy while the right side displays each
reporting unit in a separate row with its relevant account
filter. The Preview Pane will change dynamically to display
the results of the account
filter for each reporting unit. Example below:
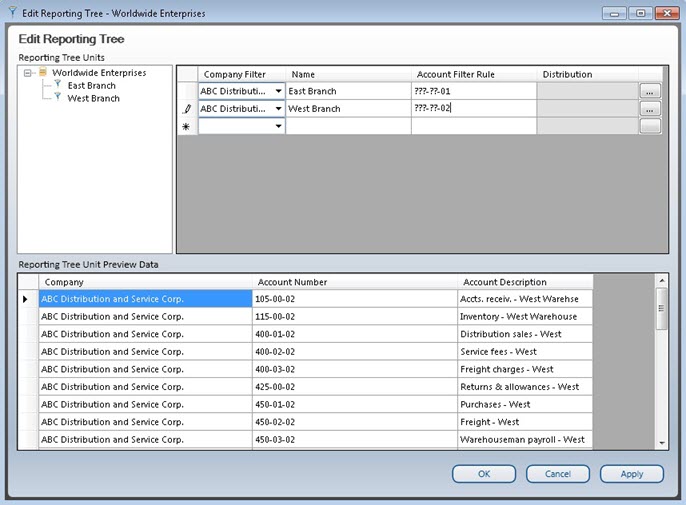
- An optional Company filter may be applied. This
will further filter the reporting unit to apply only to a specified
company.
- An optional distribution
instruction may be added to each reporting unit. The distribution
instruction entered here will automatically be linked to the generated
worksheet. This prevents instructions from having to be selected
and linked to each individual report.
- Using drag and drop functionality, you
can arrange your reporting units into parent/child
hierarchies.
- Click Apply
to save and continue. Click OK to save
and exit.